Difference between revisions of "Zero-Relay"
From SB-Components Wiki
(Created page with "<div class="row"> <div class="large-8 column"> == Zero Relay == Zero Relay provides a solution for controlling high current/voltage devices and makes your home appliances in...") |
|||
| (16 intermediate revisions by the same user not shown) | |||
| Line 12: | Line 12: | ||
* 40 Pin Stacking Header for accessing GPIO of RPi. | * 40 Pin Stacking Header for accessing GPIO of RPi. | ||
* Mounting holes | * Mounting holes | ||
| − | |||
=== Specifications === | === Specifications === | ||
| Line 22: | Line 21: | ||
</div> | </div> | ||
<div class="large-4 column"> | <div class="large-4 column"> | ||
| − | [[File: | + | [[File:Zero_relay.png|thumb|left|alt=Pico 1.14 LCD HAT| Buy it From : ''[https://shop.sb-components.co.uk/products/zero-relay-2-channel-5v-relay-board-for-raspberry-pi Click Here]'']] |
</div> | </div> | ||
</div> | </div> | ||
| − | + | == Pinout == | |
<table class="wikitable"> | <table class="wikitable"> | ||
<tr> <th> Relays </th> <th>BOARD </th> <th> BCM</th> </tr> | <tr> <th> Relays </th> <th>BOARD </th> <th> BCM</th> </tr> | ||
| Line 36: | Line 35: | ||
== Installation == | == Installation == | ||
==== Python ==== | ==== Python ==== | ||
| + | * Stack Zero-Relay HAT on Raspberry Pi Zero or any Raspberry Pi 40 Pin GPIO header. | ||
| + | * Make sure both jumpers are connected. | ||
* Open Terminal and clone/download the repository by typing below command in terminal: | * Open Terminal and clone/download the repository by typing below command in terminal: | ||
| − | < | + | <source lang="shell"> git clone https://github.com/sbcshop/Zero-Relay.git </source> |
* Your code will be downloaded to '/home/pi' directory. Use 'ls' command to check the list of directories and 'cd' command to enter directory. | * Your code will be downloaded to '/home/pi' directory. Use 'ls' command to check the list of directories and 'cd' command to enter directory. | ||
| − | < | + | <source lang="shell"> cd Zero-Relay </source> |
| − | * | + | * <b> 'test2.py'</b> is example code for Zero Relay. Run test2 file and play with Zero Relay by running below python command. |
| − | < | + | <source lang="shell"> python3 test2.py </source> |
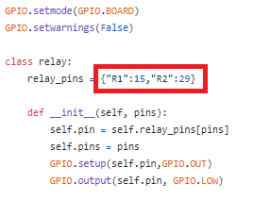
| + | * You can also use any other GPIO of Raspberry Pi by removing the jumpers and connecting the relay pin <b> RL1 and RL2 </b> directly to the Raspberry Pi GPIO header using jumper cables or wire. Edit "pizero_2relay.py" file and change the BOARD numbering of the relay and save it. | ||
| + | <gallery widths=300px heights=200px> | ||
| + | File:Zero_Relay_Pin_Change.PNG | ||
| + | File:Zero_relay_wire_con.jpg | Click on image to enlarge | ||
| + | </gallery> | ||
<b> GPIO 4 Relay Not working Fix </b> | <b> GPIO 4 Relay Not working Fix </b> | ||
| Line 53: | Line 59: | ||
== Resources == | == Resources == | ||
| + | |||
| + | |||
| + | ''' Github ''' | ||
| + | |||
| + | * [https://github.com/sbcshop/Zero-Relay Source Code] | ||
Latest revision as of 10:45, 12 July 2021
Zero Relay
Zero Relay provides a solution for controlling high current/voltage devices and makes your home appliances intelligent. It could be a nice solution for controlling devices that could not be directly controlled by RPi's Digital I/Os. The standardized shield form factor enables a smooth connection with Raspberry Pi and compatibles. It is a 2 channel relay shield with 7A 250 Volts AC output and 10A 30Volts DC output ratings. Zero Relay is designed for triggering at high voltage levels.
Features
- 2 High-quality Relay and loads up to 250VAC/7A, 30VDC/10A.
- Standardized shield shape and design.
- LEDs working status indicators for each Relay.
- High-quality Relays.
- 40 Pin Stacking Header for accessing GPIO of RPi.
- Mounting holes
Specifications
- Channel - 2 CH
- Operating Voltage - 5V
- AC Control Voltage - 7A / 250V
- DC Control Voltage - 10A / 30V

Buy it From : Click Here
Pinout
| Relays | BOARD | BCM |
|---|---|---|
| Relay 1 | 15 | GPIO 22 |
| Relay 2 | 29 | GPIO 5 |
Installation
Python
- Stack Zero-Relay HAT on Raspberry Pi Zero or any Raspberry Pi 40 Pin GPIO header.
- Make sure both jumpers are connected.
- Open Terminal and clone/download the repository by typing below command in terminal:
git clone https://github.com/sbcshop/Zero-Relay.git
- Your code will be downloaded to '/home/pi' directory. Use 'ls' command to check the list of directories and 'cd' command to enter directory.
cd Zero-Relay
- 'test2.py' is example code for Zero Relay. Run test2 file and play with Zero Relay by running below python command.
python3 test2.py
- You can also use any other GPIO of Raspberry Pi by removing the jumpers and connecting the relay pin RL1 and RL2 directly to the Raspberry Pi GPIO header using jumper cables or wire. Edit "pizero_2relay.py" file and change the BOARD numbering of the relay and save it.
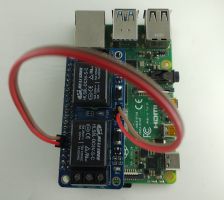
Click on image to enlarge


GPIO 4 Relay Not working Fix
- Click on Start button >> Preferences >> Raspberry Pi Configuration, Then click on Interfaces Tab and make sure 1-Wire is disabled.
- Click on OK button then reboot Raspberry pi.

Resources
Github