Microbit-Servo-Driver

From SB-Components Wiki

Revision as of 06:34, 23 June 2021 by Sbcshop (talk | contribs) (Created page with "<div class="row"> <div class="large-8 column"> == Micro:Bit Servo Driver == 16 Channel Servo Driver for micro:bit is a motor driver from which one can control up to 16 motor...")
(diff) ← Older revision | Latest revision (diff) | Newer revision → (diff)

Micro:Bit Servo Driver

16 Channel Servo Driver for micro:bit is a motor driver from which one can control up to 16 motors simultaneously. If you're building a robot with a lot of moving parts, or if you need to monitor a lot of servo motors with PWM yields, the microcontroller's limited PWM yields will be a big problem. The most important thing you can do to solve this problem is to obtain a 16-Channel 12-Bit PWM/Servo Driver.

Features

  • Adjustable frequency PWM up to about 1.6 KHz
  • Up to 16-Channel servo/PWM outputs, 12-bit resolution for each channel (4096 scales)
  • 3 pin connectors in groups of 4 so you can plug in 16 servos at once
  • This board/chip uses an I2C 7-bit address
  • Expansion Headers for easy connections
  • I2C controlled and external power supply connector
  • Compatible with Micro:bit and Micro:bit V2


Specifications

  • Power supply: 5V OR 6V (power supply connector)
  • Servo voltage: 5V
  • Logic voltage: 3.3V
  • Driver: PCA9685
  • Control interface: I2C

Pinout

PIN Description
VCC Power (5V/6V)
GND Ground

Programming

Drag and Drop

Many people want to learn the process to learn more about micro:bit by getting an understanding of the potential of micro:bit. If one wants to run servo motor and DC motor with the micro:bit motor driver then they can do the following steps.

  • A user needs to connect the PWM servo motor to the connector(3 pin header) of the servo driver board, labelled as P0, P1, and P2 to connect up to 3 servo motors and Upto 2 DC motors on connector labelled as MA1, MA2 for motor 1 and MB1 and MB2 for motor 2.
  • Take micro:bit and stack it on the motor driver board’s edge connector.
  • Connect VIN and ground or the external power supply to the motor driver to provide power to it.
  • A user needs to switch on the slider switch of the motor driver.
  • To start a new project development using motor driver board, kindly visit https://makecode.microbit.org/#
  • Start a new project by clicking on New Project tab, It will Open a Programming and Simulation Interface where you can write code , connect board and program it in 1 click.
  • A user needs to add an extension for SB motor driver via clicking on the tab Advanced >> Extensions and enter the mentioned URL below in search box.
  • https://github.com/sbcshop/Micro-Bit-Motor-Driver
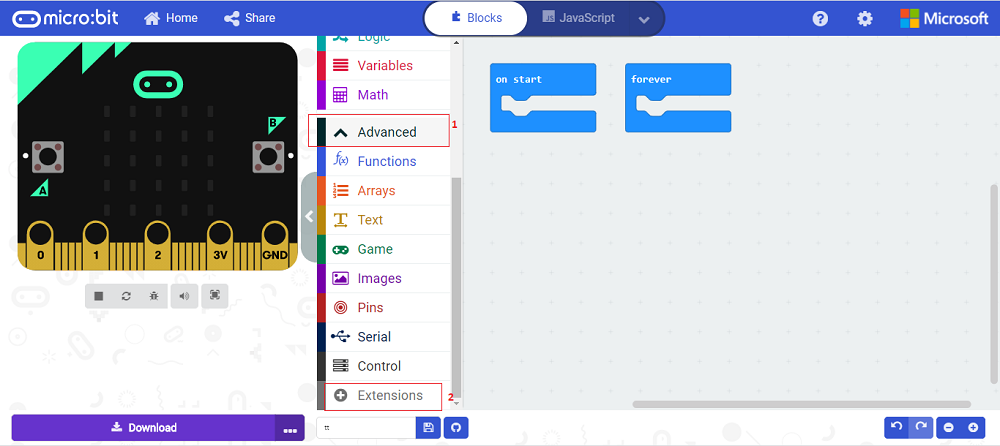
    add_ext1.png

  • Click on Search button after entering above url, Now look for the search result to add the extension to the project(current). makecode micro:bit

  • add_ext2_1.png

  • Control your servo motor and DC motor by motor driver Extension drag and drop blocks as shown in below example.

  • Microbit Motor driver code.PNG

    Resources